How To Lay Porcelain Paving
Porcelain Paving
Our premium porcelain outdoor tiles offer a stylish alternative to stone or concrete flagstones and our wood effect ranges create the look of high-end timber decking but with many added benefits such as good slip resistance. Hard wearing and practical, these tiles have a 10 year guarantee, are simple to install and require no sealing – the perfect way to create a durable and low maintenance living space that’s great for the whole family. Selected designs also have coordinating indoor tiles for seamless living spaces from inside your home and out into the garden.
How To Lay Porcelain Paving – Design Inspiration
When it comes to laying a patio area in your garden, many people choose a regular grid o square or rectangular slabs, all the same size and colour. It’s surprisingly easy to create a practical yet beautiful space by playing with different textures, colours and laying patterns.
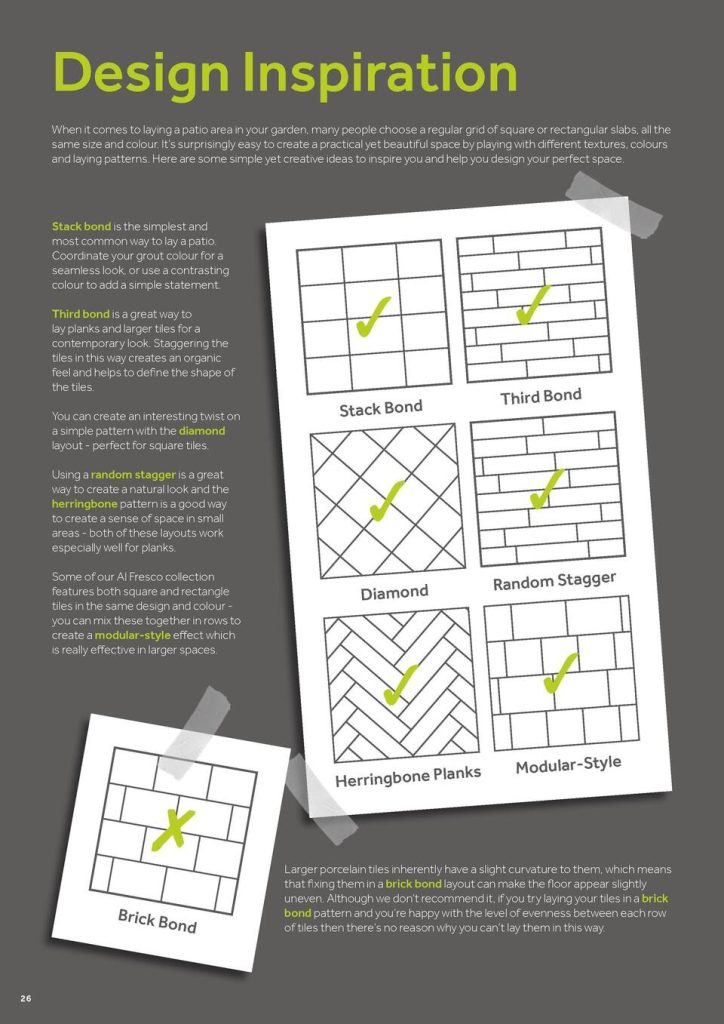
Here are some simple yet creative ideas to inspire you and help you design your perfect space.
- Stack Bond is the simplest and most common way to lay a patio. Coordinate your grout colour for a seamless look, or use a contrasting colour to add a simple statement.
- Third bond is a great way to lay planks and larger tiles for a contemporary look. Staggering the tiles in this way creates an organic feel and helps to define the shape of the tiles.
- Diamond Layout is an interesting twist on a simple pattern, perfect for square tiles.
- Random Stagger is a great way to create a natural look, this design works well with plank tiles.
- Herringbone is a good way to create a sense of space in small areas, this design works well with plank tiles.
- Modular-Style is a mix of both square and rectangular tiles in the same design and colour. This is really effective in larger areas.
How To Lay Porcelain Paving – Installation Advice
With the right materials and preparation, you can easily install your own tiles. Follow these simple steps to create your own seamless outdoor space.
Handle your tiles with care to avoid breakages and seek assistance when lifting them.
How to install porcelain tiles on wet mortar –
- Firstly, mark out the area where you want the patio to be with marking spray which can be purchased here on our website – https://thecobbleshop.co.uk/product/upside-down-marking-paint/ . Measure the length and width of your area and multiply these values together to calculate the square meterage.
- Before you lay your tiles you will need to prepare the ground by diffing to a depth of around 150-200mm.
- Fill with hardcore, we recommend Type One – https://thecobbleshop.co.uk/product/type-1/. We recommend filling the area to a depth of around 100-150mm and use a rake to distribute the mixture. Compress the hardcore using a whacker power plate.
- Add a layer of mortar on top of the compressed hardcore. We recommend 4 parts sand to 1 part cement.
- Coat the back of your tiles with Instarmac Pro-Prime Slurry to create a sticky surface for the mortar and tiles to lay on and fix them in place – https://thecobbleshop.co.uk/product/instarmac-pro-prime-slurry-grey/
- Place the tile into position, using a corner as a starting point – for example, next to a wall or house. Press into place and use a rubber mallet and spirit level to secure and adjust the level remembering to take drainage into consideration. Continue to lay the tiles in this way leaving a 3-5mm gap between each one.
- Avoid walking on your newly laid patio for a minimum of 24-48 hours to allow it to dry and strengthen. If you wish to fill any gaps, we recommend using ProPave Brush-In Grout designed for outdoor porcelain tiles – https://thecobbleshop.co.uk/?product_cat=&post_type=product&s=grout. Use a brush to mix over the joints, gradually and evenly filling them all in. Once the joints are filled, use a pointing trowel to firm the grout into place. Add more grout if needed to create a clean and level finish.